Monthly Archives: August 2017

Metadata Quality Interfaces: Facet Dashboard

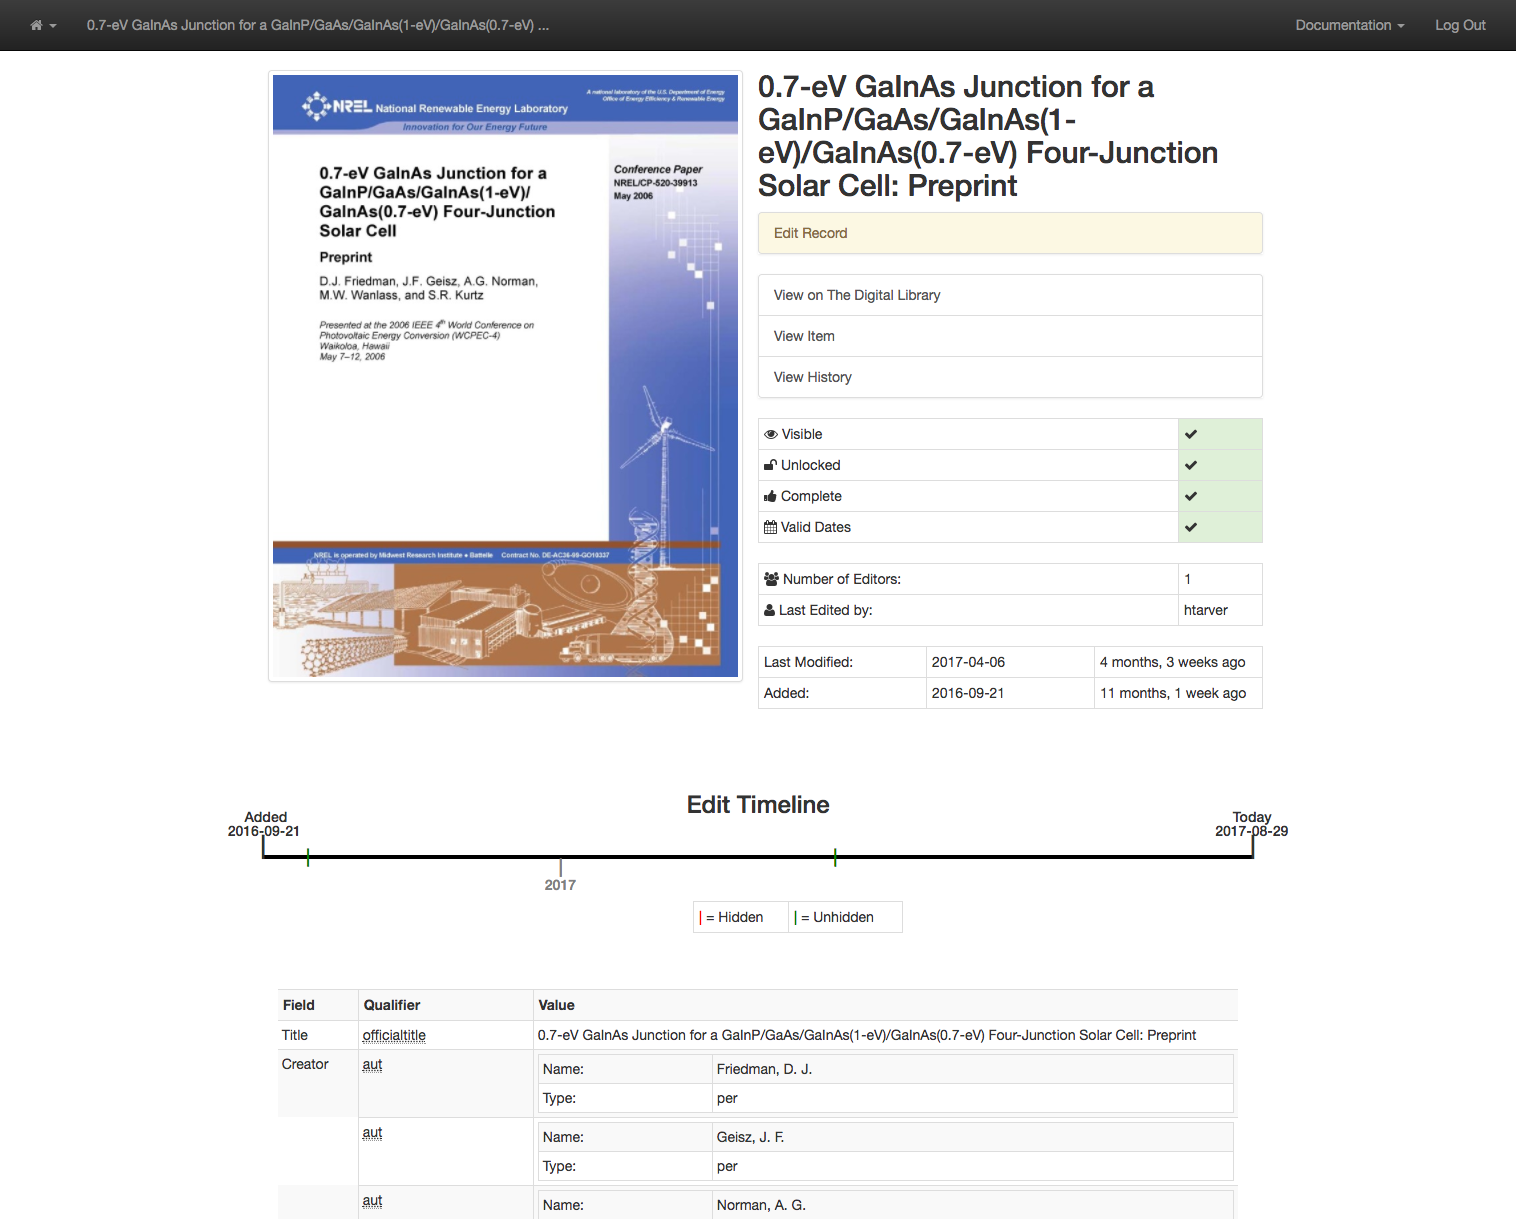
This is the second post in a series that discusses the new metadata interfaces we have been developing for the UNT Libraries’ Digital Collections metadata editing environment. The previous post was related to the item views that we have created.

This post discusses our facet dashboard in a bit of depth.  Let’s get started.

Facet Dashboard

A little bit of background is in order so that you can better understand the data that we are working with in our metadata system.  The UNT Libraries uses a locally-extended Dublin Core metadata element set. In addition to locally-extending the elements to include things like collection, partner, degree, citation, note, and meta fields we also qualify many of the fields. A qualifier usually specifics what type of value is represented.  So a subject could be a Keyword, or an LCSH value. A Creator could be an author, or a photographer.  Many of the fields have the ability to have one qualifier for the value.

When we index records in our Solr instance we store strings of each of these elements, and each of the elements plus qualifiers, so we have fields we can facet on.  This results in facet fields for creator as well as specifically creator_author, or creator_photographer.  For fields that we expect the use of a qualifier we also capture when there isn’t a qualifier in a field like creator_none.  This results in many hundreds of fields in our Solr index but we do this for good reason,  to be able to get at the data in ways that are helpful for metadata maintainers.

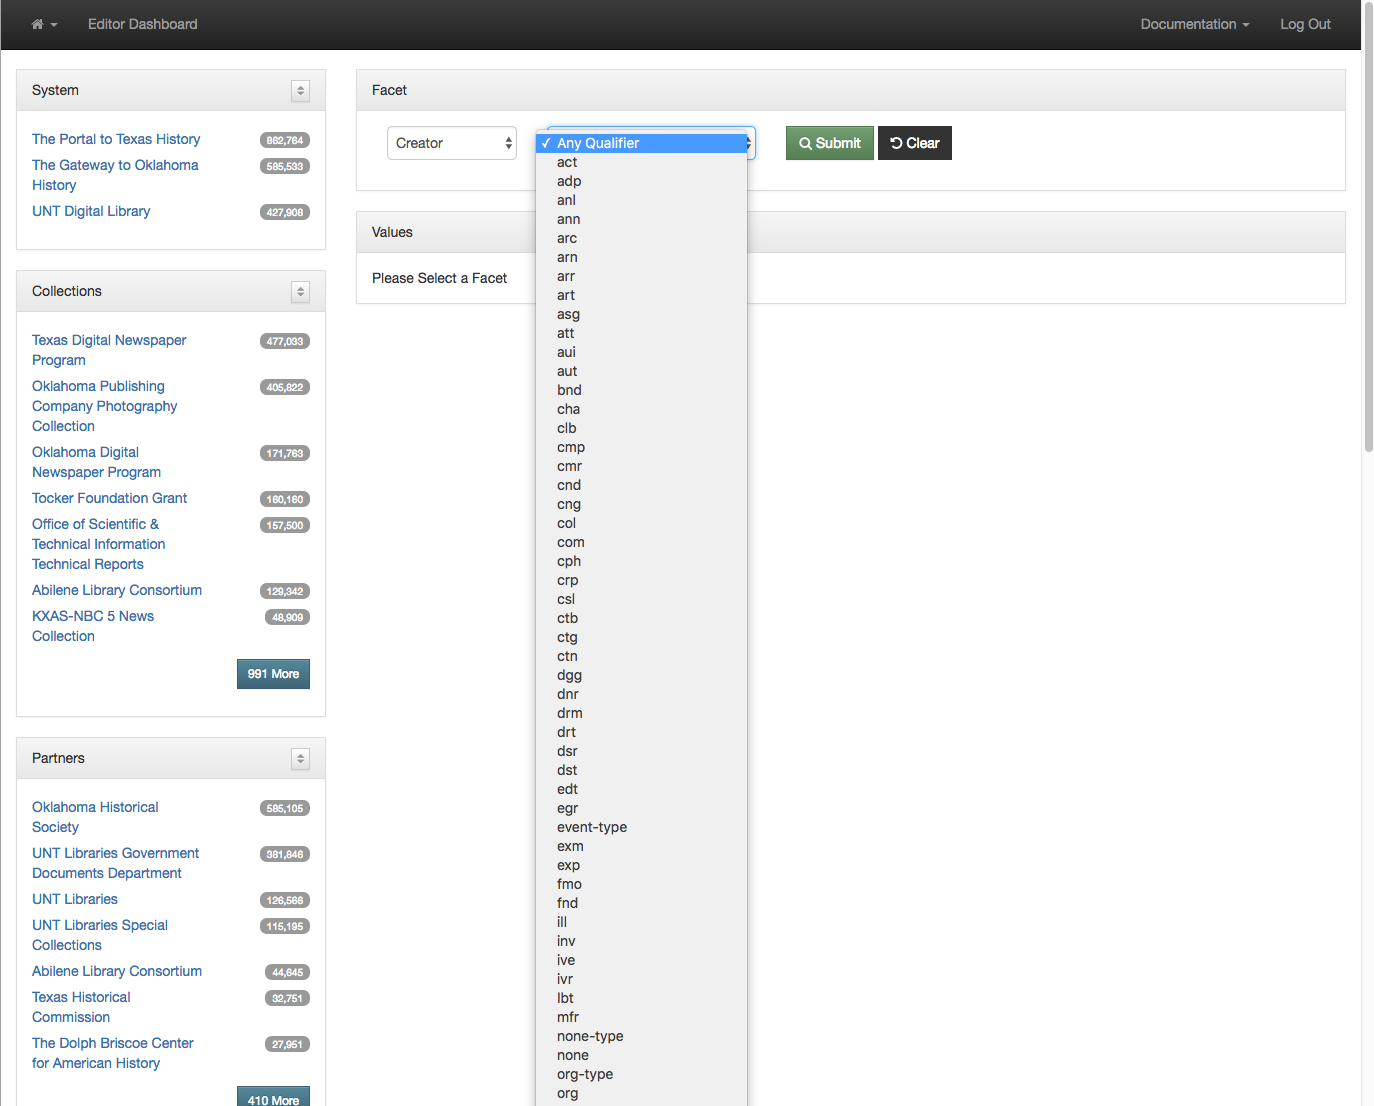
The first view we created around this data was our facet dashboard.  The image below shows what you get when you go to this view.

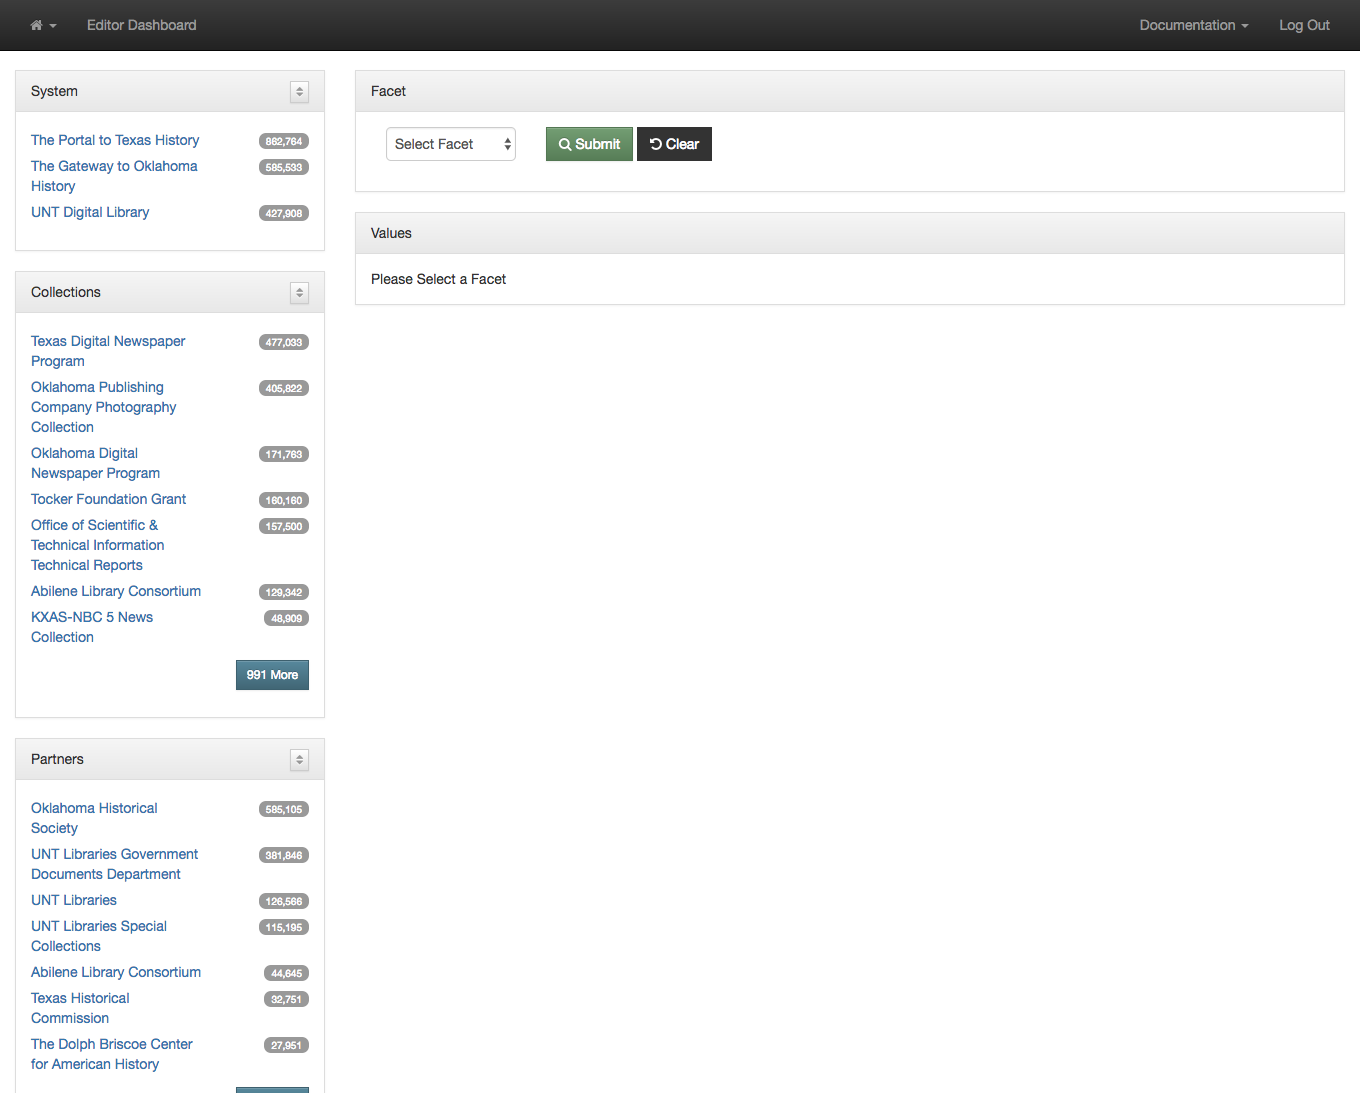
Default Facet Dashboard

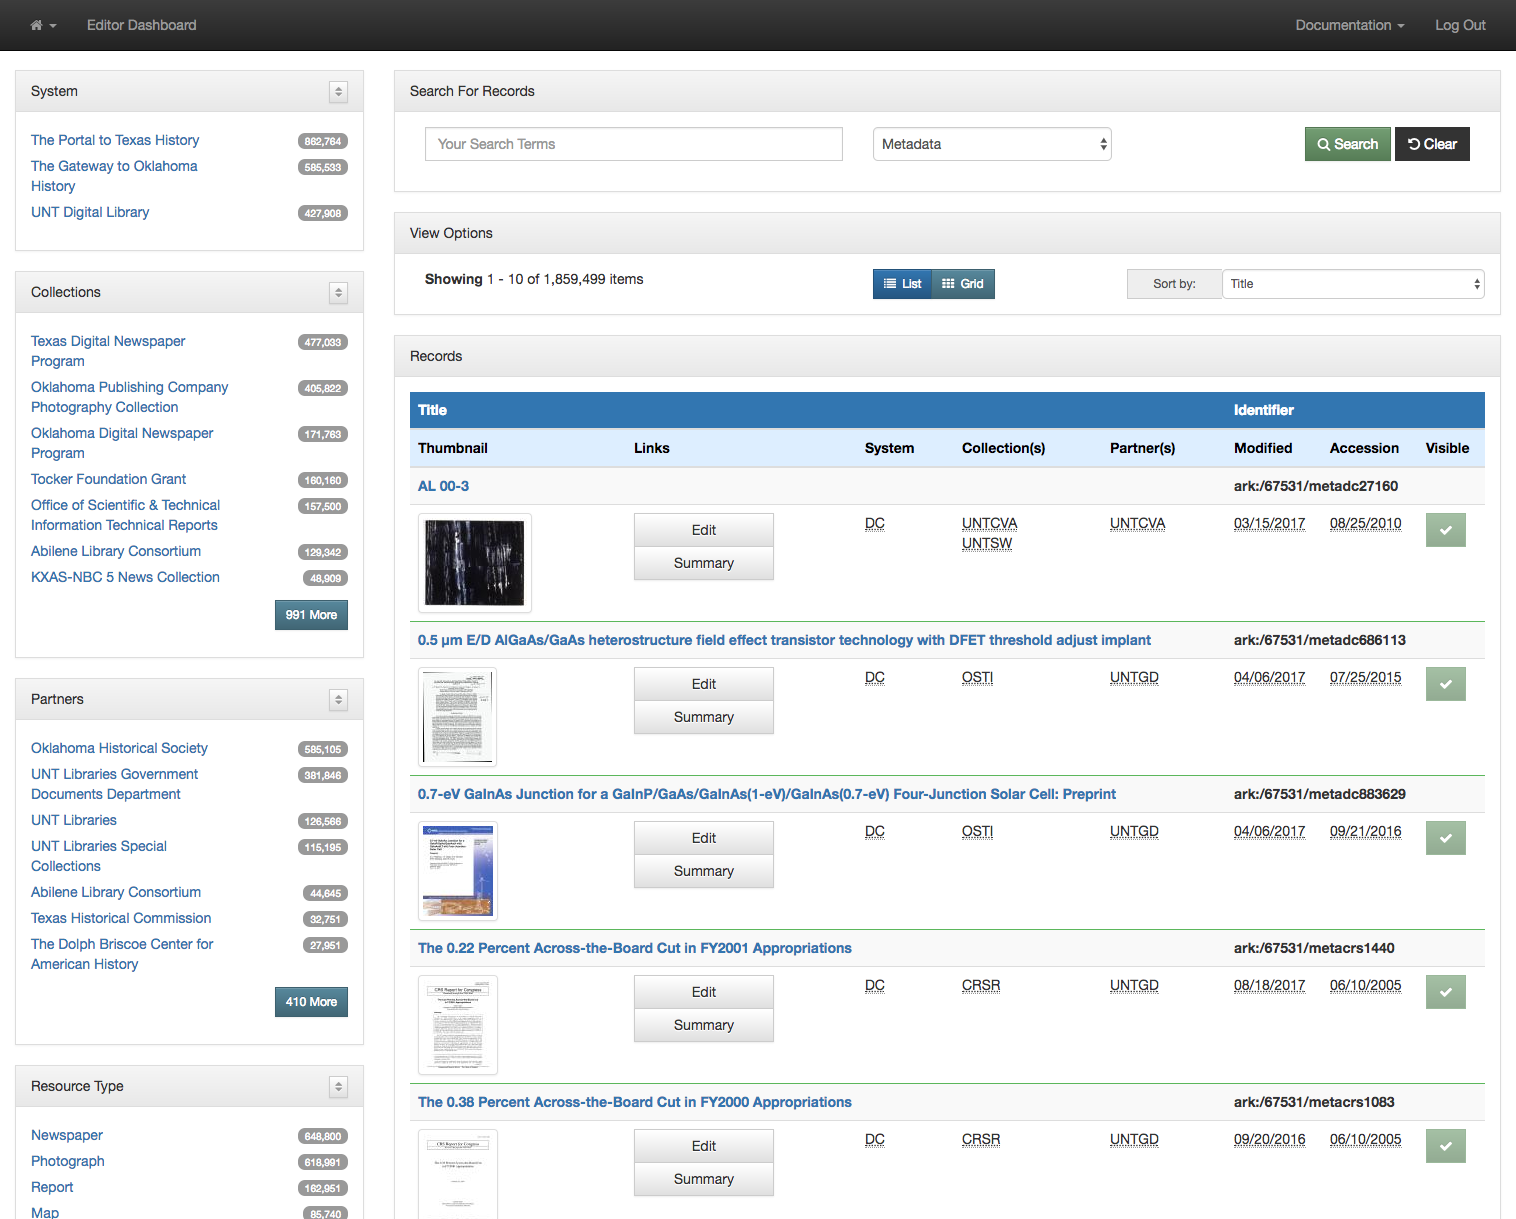
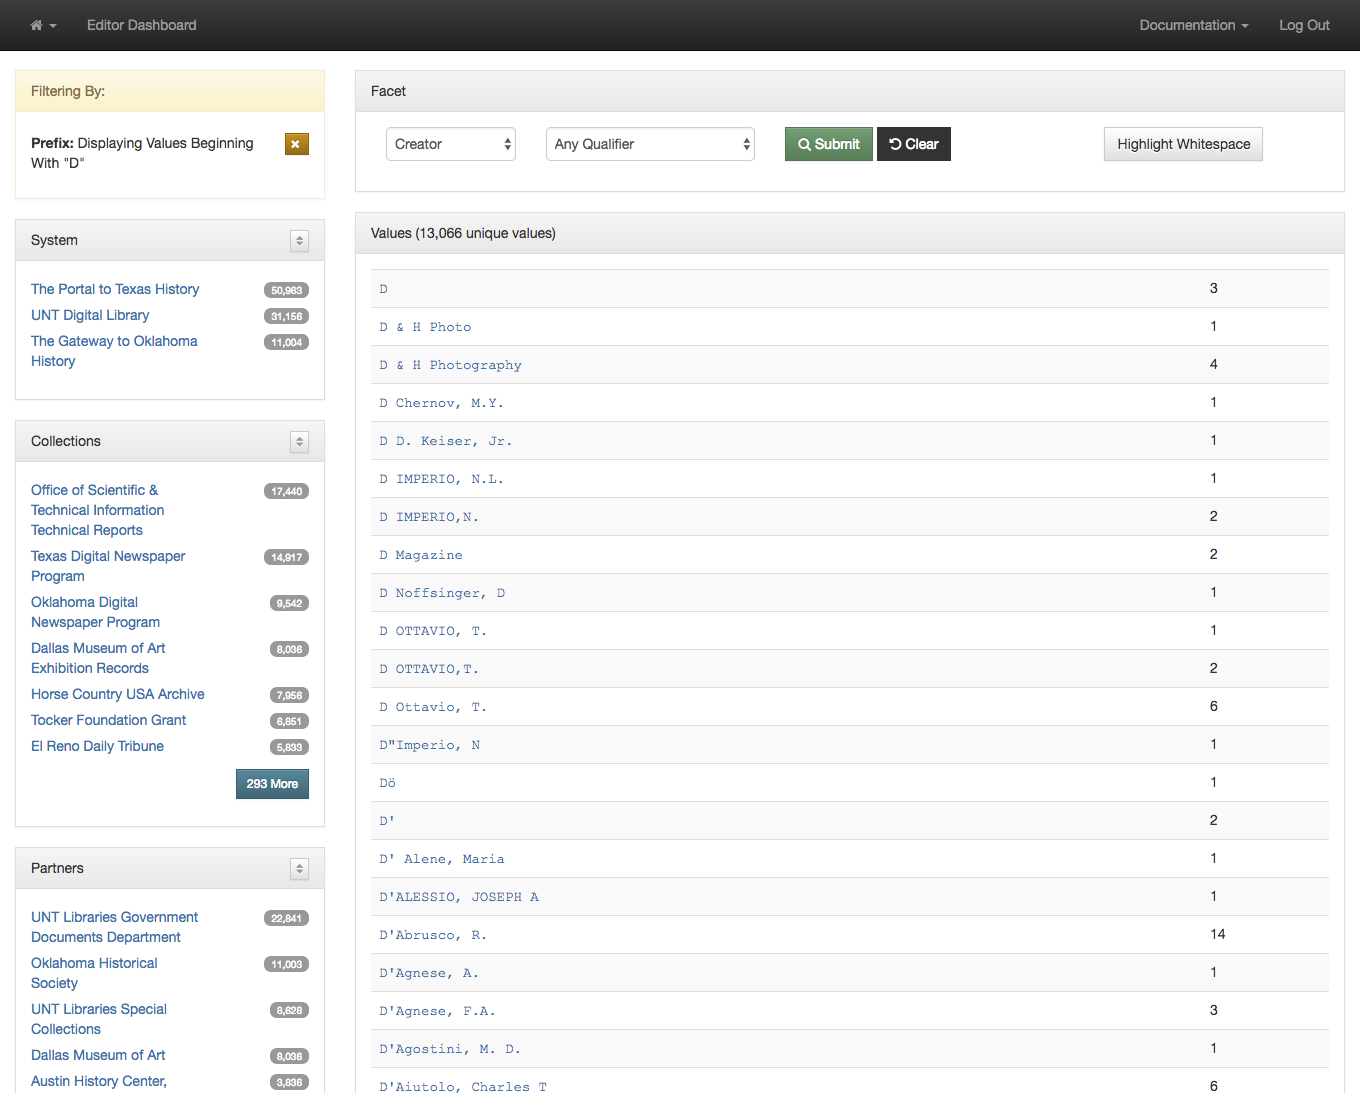
On the left side of the screen you are presented with facets that you can make use of to limit and refine the information you are interested in viewing.  I’m currently looking at all of the records from all partners and all collections.  This is a bit over 1.8 million records.

The next step is to decide which field you are interested in seeing the facet values for.  In this case I am choosing the Creator field.

Selecting a field to view facet values

After you make a selection you are presented with a paginated view of all of the creator values in the dataset (289,440 unique values in this case). These are sorted alphabetically so the first values are the ones that generally start with punctuation.

In addition to the string value you are presented the number of records in the system that have that given value.

All Creator Values

Because there can be many many pages of results sometimes it is helpful to jump directly to a subset of the records.  This can be accomplished with a “Begins With” dropdown in the left menu.  I’m choosing to look at only facets that start with the letter D.

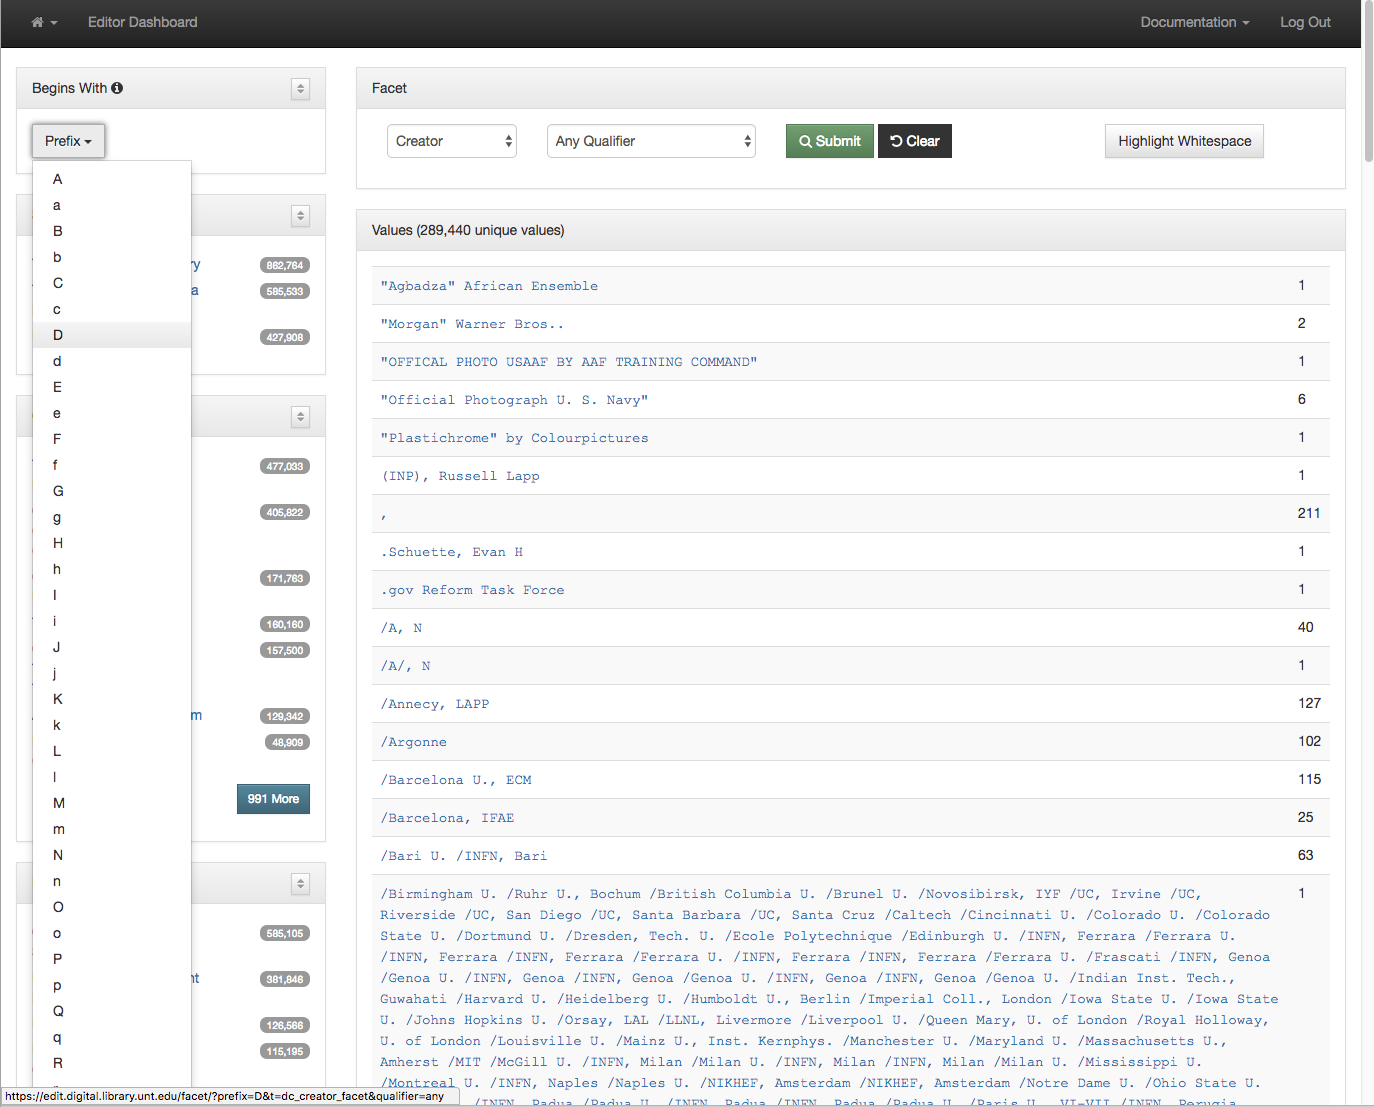
Limit to a specific letter

After making a selection you are presented with the facets that start with the letter D instead of the whole set.  This makes it a bit easier to target just the values you are looking for.

Creator Values Starting with D

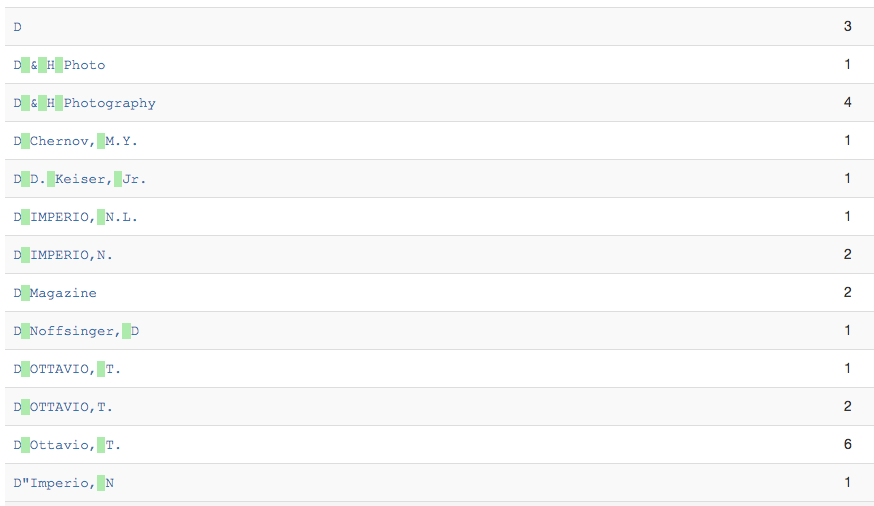
Sometimes when you are looking at the facet values you are trying to identify values that fall next to each other but that might differ only a little bit. One of the things that can make this a bit easier is having a button that can highlight just the whitespace in the strings themselves.

Highlight Whitespace Button

Once you click this button you see that the whitespace is now highlighted in green.  This highlighting in combination with using a monospace font makes it easier to see when values only differ with the amount of whitespace.

Highlighted Whitespace

Once you have identified a value that you want to change the next thing to do is just click on the link for that facet value.

Identified Value to Correct

You are taken to a new tab in your browser that has just the records that have the selected value.  In this case there was just one record with “D & H Photo” that we wanted to edit.

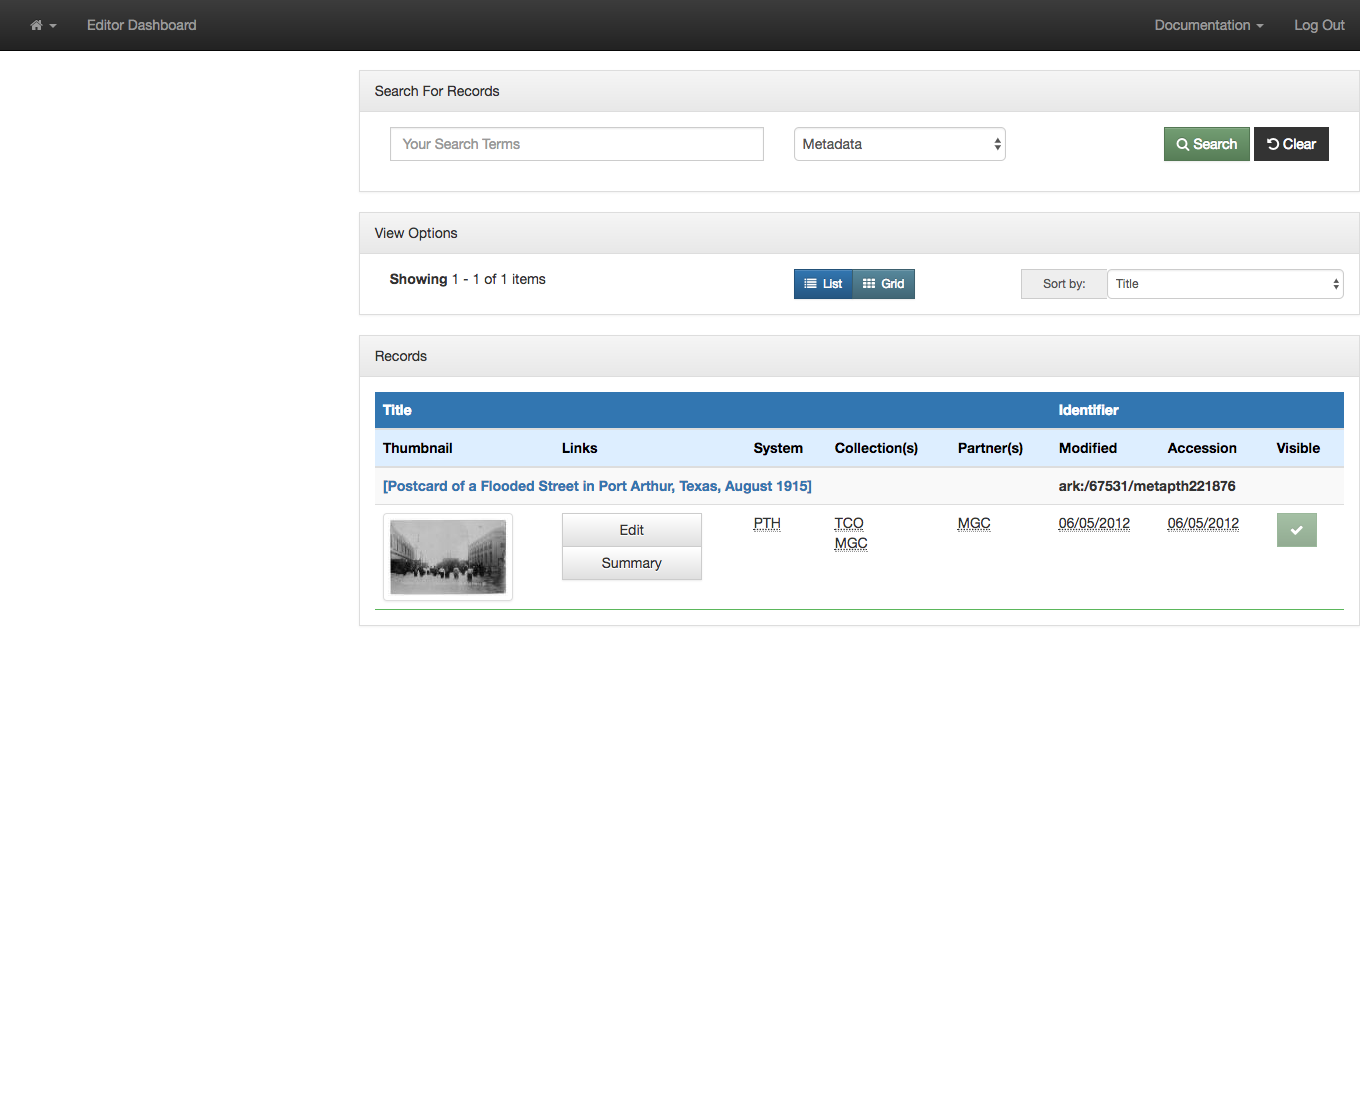
Record with Identified Value

We have a convenient highlighting of visited rows on the facet dashboard so you know which values you have clicked on.

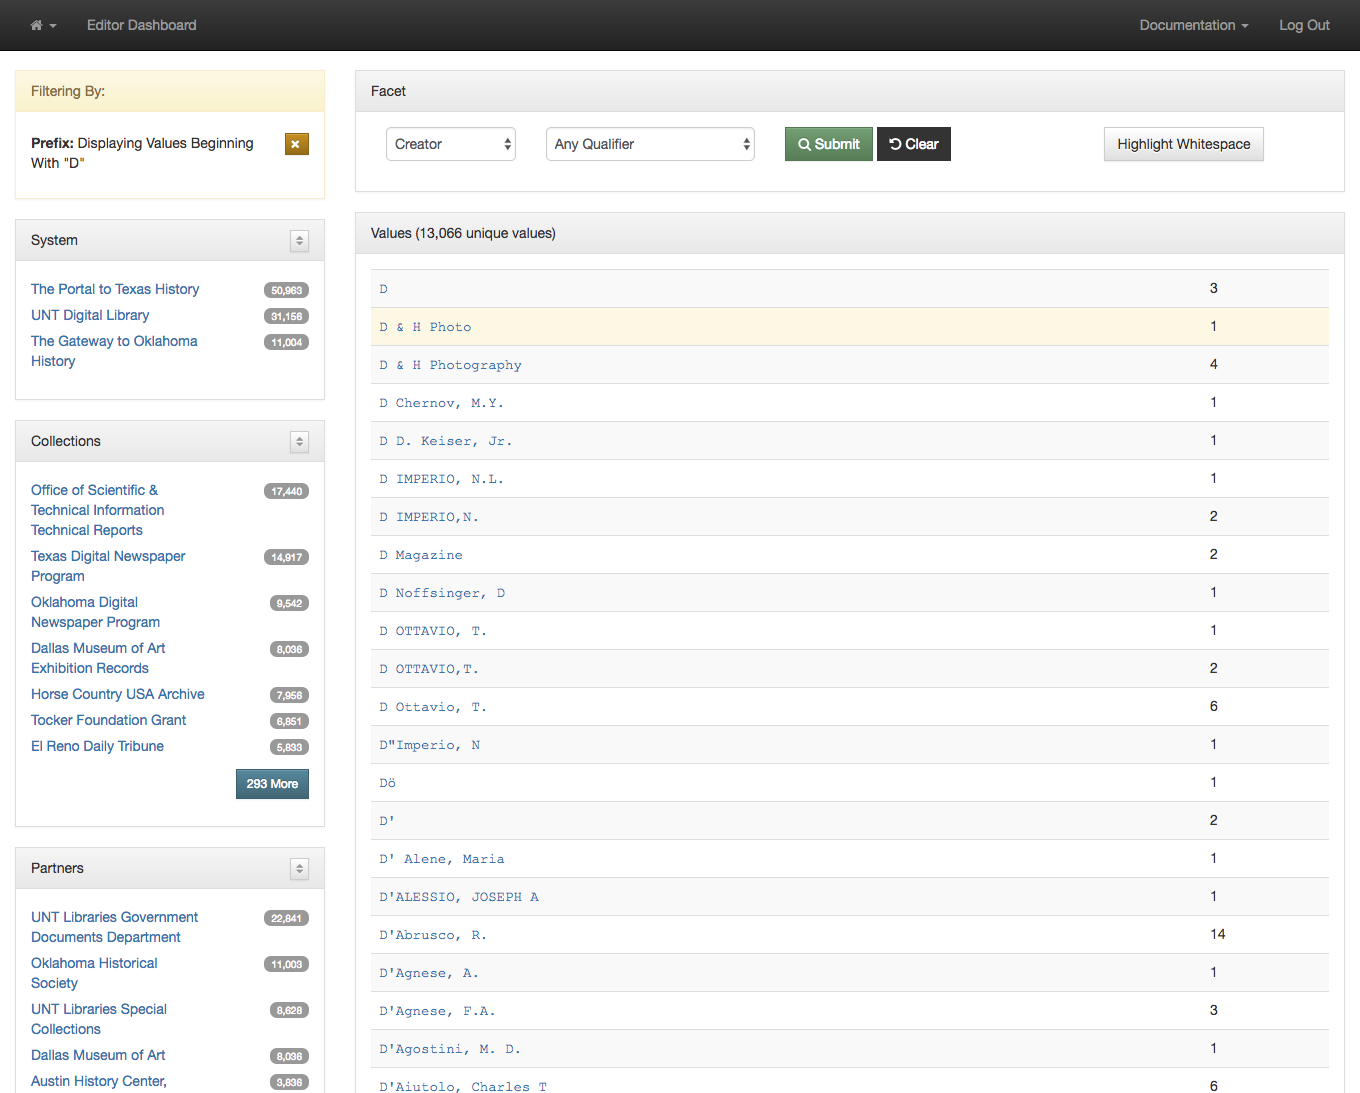
Highlighted Reminder of Selected Value

In addition to just seeing all of the values for the creator field you can also limit your view to a specific qualifier by selecting the qualifier dropdown when it is available.

Select an Optional Qualifier

You can also look at items that don’t have a given value, for example Creator values that don’t have a name type designated.  This is identified with a qualifier value of none-type.

Creator Values Without a Designated Type

You get just the 900+ values in the system that don’t have a name type designated.

All of this can be performed on any of the elements or any of the qualified elements of the metadata records.

While this is a useful first step in getting metadata editors directly to both the values of fields and their counts in the form of facets, it can be improved upon.  This view still requires users to scan a long long list of items to try and identify values that should be collapsed because they are just different ways of expressing the same thing with differences in spacing or punctuation. It is only possible to identify these values if they are located near each other alphabetically.  This can be a problem if you have a field like a name field that can have inverted or non-inverted strings for names.  So there is room for improvement of these interfaces for our users.

Our next interface to talk about is our Count Dashboard.  But that will be in another post.

If you have questions or comments about this post,  please let me know via Twitter.


Updating Metadata Interfaces: Item Views

As we get started with a new school year it is good to look back on all of the work that we accomplished over the summer.

There are a few reasons that we are interested in improving our metadata entry systems. First as we continue to add records and approach our 2 millionth item in the system, it is clear that effective management of metadata is important. We also see an increase in the resources being allocated to editing metadata in our digital library systems. We are to a point where there are more people using the backend systems for non-MARC metadata than we have working with the catalog and MARC based metadata. Because of this we are seeing our metadata workers spend more and more time in this system so it is important that we try and make things better so that they can complete their tasks easier.  This improves quality, costs, and our workers sanity.

This blog post is just a quick summary of some of the changes that we have made around item records in the UNT Libraries Digital Collection’s Edit System.

Dashboard View

Not much really has changed with the edit dashboard other thank making room for the views that I’m going to talk about later in this post.  Historically when an editor clicked on either the title or the thumbnail of the record, it would take them to the edit view for the record.  In fact that was pretty much the only public view for an item’s record, edit.

While editing or creating a record is the primary activity you want to do in this system, there are many times when you want to look at the records in different ways.  This previously wasn’t possible without having to do a little URL hacking.

Now when you click on the thumbnail, title, or summary button you are taken to the summary page that I will talk about next.  If you click the Edit button you are then taken to the edit view .

Edit Dashboard

Record Summary View

We wanted to add a new landing page for an item in our editing system so that a user could just view or look at a record instead of always having to jump into the edit window.  There are a number of reasons for this.  First off the edit view isn’t the easiest to see what is going on in a metadata record,  it is designed to edit fields and does not give you a succinct view of the record.  Second it actually locks the record for a period of time when it is open.  So even if you just open it and leave it alone, it will be locked in the system for about half an hour.  This doesn’t cause too many issues but it isn’t ideal. Finally just having an edit view resulted in a high number of “edits” to records that really weren’t edits at all, users were just hitting publish in order to clear out the record an close it.  Because we version all of our metadata changes this just adds versions that don’t really represent much in a way of change between records.

We decided that we should introduce a summary view for each record.  This would allow us to provide an overview of the state of an item record as well as providing a succinct metadata view and finally a logical place to put additional links to other important record views.

The image below is the top portion of a summary view for a metadata record in the system. I will go thorough some of the details below.

Record Summary

The top portion of the summary view gives a large image that represents the item.  This is usually the first page of the publication, the front of a photograph or map (we scan the backs of everything), or a thumbnail view of a moving image item.  Next to that you will see a large title to easily identify the title of the item.

Below that is a quick link to edit the record in the edit view.  If the item is visible to the public then you can quickly jump to the live view of the record with the “View in the Digital Library” link. Next we have a “View Item” link that takes you to a viewer that allows you to page through the object even if it isn’t online yet.  This item view is used during the creation of metadata records.  Finally you see a link to the “View History” link that takes you to an overview of the history of the item to see when things changed and who changed them.

Below are some quick visuals for if the item is public, if it is currently unlocked and able to be edited by the user, if the metadata has a completeness score of 1.0 (minimally viable record) and finally if all of the dates in the item are valid Extended Date Time dates.

This is followed by the number of unique editors that have edited the record, and the username of the last editor of the record.  Finally the date the item was last edited, and when it was added to the system are shown.

Record Interactions

Since we do keep the version history of all of the changes to a metadata record over time we wanted to give an idea of the lifecycle of the record.  A record can go back and forth from a state of hidden to public and sometimes back to hidden.  We decided a simple timeline would be a good way to better visualize these different states of records over time.

Record Timeline

The final part of the summary view is the succinct metadata display.  This is helpful to get a quick overview of a record.  It is in a layout that is consistent across fields and records of different types.  It will all print to about a page if you need to print it out in paper format (something that you really need to be able to do from time to time).

Succinct Record Display

History View

We have had a history view for each item for a number of years but until this summer it was only available if you knew to add /history/ to the end of a URL in the edit system.  When we added the summary page we now had a logical place to place a link to this page.

The only modification we’ve done for the page is a little bit of coloring for when a change results in a size difference in the record.  Blue for growth and orange for a reduction in size. There are a few more changes that I would like us to make to the history view which we will probably work on in the fall.  The main thing I want to add is more information about what changed in the records,  which fields for instance.  That’s very helpful in trying to track down oddities in records.

Record History

Title Case Helper

This last set of features are pretty small but are actually a pretty big help when they are needed.  We work with quite a bit of harvested data and metadata from different systems that we add to our digital collections. When we get these dataset sometimes they had different views of when to capitalize and when not to capitalize words. We have a collection from the federal government that has all of the titles and names all in uppercase.  Locally we tend to recommend a fairly standard title case for things like titles, and names also tend to follow this pattern.

We added some javascript helpers to identify when a title, creator, contributor, or publisher is in upper case and present the user with a warning message.  We actually are looking at instances that have more than 50% capital letters in the string. The warning doesn’t keep a person from saving the record, just gives them a visual clue that there is something they might want to change.

Title Case Warnings

After the warning we wanted to make it easier for users to convert a string from upper case to title case. If you haven’t tried to do this recently it is actually pretty time consuming and generally results in you just having to retype the value instead of changing it letter by letter. We decided that a button that could automatically convert the value into title case would save quite a bit of time.  The image below shows where this TC button is located for the title, creator, contributor, and publisher fields.

Creator Title Case Detail

Once you click the button it will change the main value to something that resembles title case.  It has some logic to deal with short words that are generally not capitalized like: and, of, or, the.

Corrected Title Case Detail

This saves quite a bit of time but isn’t perfect.  If you have abbreviations in the string they will be lost so you sometimes have to edit things after hitting the tc button.  Even so, it helps with a pretty fiddly task.

That covers many of changes that we made this summer to the item and record views in our system.  There are a few more interfaces that we added to our edit system that I will try and cover in the next week or so.

If you have questions or comments about this post,  please let me know via Twitter.