At the library we are working on a project to digitize television news scripts from KXAS, the NBC affiliate from Fort Worth. These scripts were read on the air during the broadcast and are a great entry point into a vast collection of film and tape collection that is housed at the UNT Libraries.
To date we’ve digitized and made available over 13,000 of these scripts.
In looking at workflows we noticed that sometimes the scanners and scanning software would leave several rows of white pixels at the leading or trailing end of the image.

It is kind of hard to see that because this page has a white background so I’ll include a closeup for you. I put a black border around the image to help the white stand out a bit.

Detail of leading white edge
One problem with these white rows is that they happen some of the time but not all of the time. Another problem is that the number of white lines isn’t uniform, it will vary from image to image when it occurs. The final problem is that it is not consistently at the top or at the bottom of the image. It could be at the top, the bottom, or both.
Probably the best solution to this problem is going to be getting different control software for the scanners that we are using. But that won’t help the tens of thousands of these image that we have already scanned and that we need to process.
Trimming white line
Manual
There are a number of ways that we can approach this task. First we can do what we are currently doing which is to have our imaging students open each image and manually crop them if needed. This is very time consuming.
Photoshop
There is a tool in photoshop that can sometimes be useful for this kind of work. It is the “Trim” tool. Here is the dialog box you get when you select this tool.
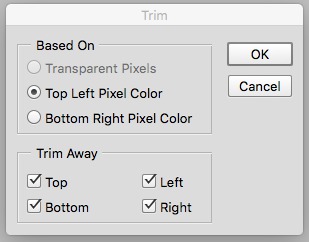
Photoshop Trim Dialog Box
This allows you to select if you want to remove from the top of bottom (or left or right). The tool wants you to select a place on the image to grab a color sample and then it will try and trim off rows of the image that match that color.
Unfortunately this wasn’t an ideal solution because you still had to know if you needed to crop from the top or bottom.
Imagemagick
Imagemagick tools have an option called “trim” that does a very similar thing to the Photoshop Trim tool. It is well described on this page.
By default the trim option here will remove edges around the whole image that match a pixel value. You are able to adjust the specificity of the pixel color if you add a little blur but it isn’t an ideal solution either.
A little Python
My next thing to look at was to use a bit of Python to identify the number of rows in an image that are white.
With this script you feed it an image filename and it will return the number of rows from the top of the image that are at least 90% white.
The script will convert the incoming image into a grayscale image, and then line by line count the number of pixels that have a pixel value greater than 225 (so a little white all the way to white white). It will then count a line as “white” if more than 90% of the pixels on that line have a value of greater than 225.
Once the script reaches a row that isn’t white, it ends and returns the number of white lines it has found. If the first row of the image is not a white row it will immediately return with a value of 0.
The next thing to go back to Imagemagick but this time use the -chop flag to remove the number of rows from the image that the previous script specified.
mogrify -chop 0x15 UNTA_AR0787-010-1959-06-14-07_01.tif
We tell mogrify to chop off the first fifteen rows of the image with the 0x15 value. This means an offset of zero and then remove fifteen rows of pixels.
Here is what the final image looks like without the leading white edge.

Corrected image
In order to count the rows from the bottom you have to adjust the script in one place. Basically you reverse the order of the rows in the image so you work from the bottom first. This allows you to apply the same logic to finding white rows as we did before.
You have to adjust the Imagemagick command as well so that you are chopping the rows from the bottom of the image and not the top. You do this by specifying -gravity in the command.
mogrify -gravity bottom -chop 0x15 UNTA_AR0787-010-1959-06-14-07_01.tif
With a little bit of bash scripting these scripts can be used to process a whole folder full of images and instructions can be given to only process images that have rows that need to be removed.
This combination of a small Python script to gather image information and then passing that info on to Imagemagick has been very useful for this project and there are a number of other ways that this same pattern can be used for processing images in a digital library workflow.
If you have questions or comments about this post, please let me know via Twitter.